
-

Common Slider
Qoppa Software offers a suite of carefully designed and developed products to cover every aspect of PDF processes and document workflows.
PDF Processing API with Mule ESB and Mulesoft Anypoint
PDF Processing API Now Integrated with Mulesoft
New!! PDF Automation Server Rest API is now available in the Muesloft Exchange as a Mulesoft Asset on the AnyPoint Platform and can be downloaded as RAML or as Mule 4 Connector. It allows to access all of Qoppa’s PDF processing features including: Sign PDF, Merge PDF, Split PDF, Import Date into PDF, OCR PDF, Convert PDF to Images, Redact PDF, Optimize PDF, Watermark PDF, etc…
See PDF API on Mulesoft Anypoint Exchange
Using Qoppa’s Java PDF Library with Mule
The instructions below are useful to create your own Mule flow using Qoppa’s Java PDF libraries and jar files.
What is Mule?
Mule is a lightweight Enterprise Service Bus (ESB) platform that allows you to create a “pluggable” architecture for IT processes.
You can easily create complex “flows” using pre-packaged and external building blocks that define your business logic. The Plain Old Java Object (POJO) example below shows how easy it is to set up Qoppa’s Java PDF Libraries as building blocks in your flows.
Install and set up Mule
- Download and install Mule Studio
- Download and extract Maven
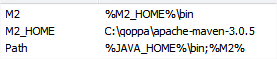
- Set up environment variables for Maven
- On Windows, our user variables look like this:
- In Mule Studio, go to Window > Preferences > Mule Studio > Maven Settings
- Enable Maven support in Mule Studio, and
- Set the Maven Installation home directory to where you extracted Maven
Example using jPDFProcess
We will define a simple flow to demonstrate the capabilities of the PDF to TIFF Transformer:
This POJO (plain old java object) example extends AbstractMessageTransformer and converts a PDF document to a TIFF image in the overridden transformMessage method.
Setting up the project
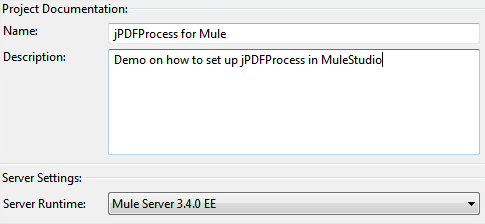
- In Mule Studio, Create a new Mule project: File > New > Mule Project
- Name the project, then accept the default values on the remaining screens
- Create a “lib” folder in the project
- Right click on the project name in the Package pane on the left, New > Folder
- Download and add the example jar files to the new lib folder
- jPDFProcess.jar
- jai_imageio.jar
- jai_codec.jar
- Add the libraries to the project’s Java Build Path
- Right click project name > Properties > Java Build Path > Libraries > Add JARs
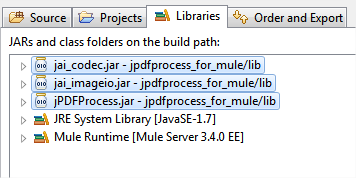
- Right click project name > Properties > Java Build Path > Libraries > Add JARs
- Create a new package for the project
- Right click src/main/java > New > Package
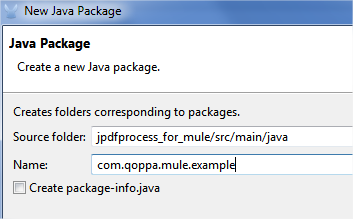
- Right click src/main/java > New > Package
- Add a class to the new package
- Right click the package name > New > Class
- You can name it anything – the next step will overwrite it
- Replace the contents of the new class with PDFToTIFF.java and save the class
Deploy Locally for Testing
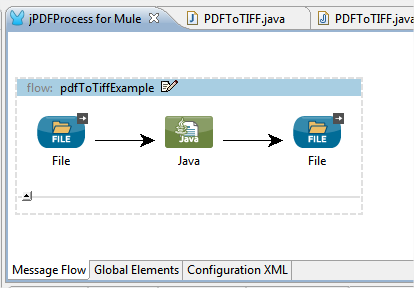
Mule provides a number of endpoints which can be used for input and output as well as transformers that can modify those inputs (or “messages”). This flow uses a file end point to watch a folder. When a .pdf file is added to the folder, it is transmitted as an input stream to our Java component. jPDFProcess then converts the PDF document to a TIFF image and writes the TIFF image to a byte array. This is transmitted to the flow’s file endpoint which writes the TIFF file to the specified directory as out.tiff.
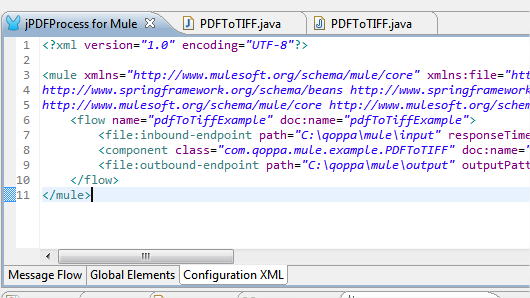
- Paste the example XML into jPDFProcess for Mule.mflow
- Click on jPDFProcess for Mule.mflow in the left pane and go to the Configuration XML tab
- Paste the example XML into the window, create the input and output paths on your computer, and save the flow
- Switch to the Message Flow tab and review the flow. Flows can be customized with different inputs and outputs, depending on the project’s needs
- Run jPDFProcess for Mule.mflow
- Right click the flow > Run As > Mule Application
- Monitor the console – once you see the “Started” message, you can test the application.
- Wait for the console to output “Started app ‘jpdfprocess_for_mule'”
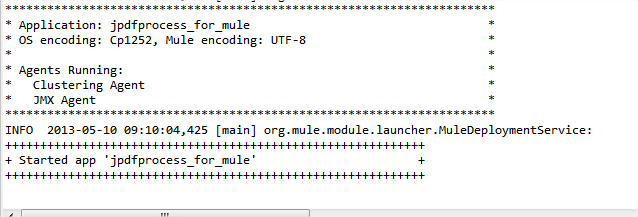
- Drop a PDF into the “input” folder and it will be processed and moved to the “output” folder as out.tiff
- Wait for the console to output “Started app ‘jpdfprocess_for_mule'”